- El Torito Corn Cake Recipe - October 21, 2024
- Air Fryer Frozen Fish Fillets No Breading - October 21, 2024
- Slow Cooker Potatoes Recipe - October 21, 2024
Fajitas have a prized place on Tex-Mex menus because of their yummy flavor.
So tasty that it’s hard to get enough, so I settled on the best recipe to make mine at home.
The thing is, homemade is cheaper, and you can add any toppings of your liking.
This makes the chicken fajita rollup Applebee’s recipe your ideal go-to during parties and family gatherings.
It comes in handy too, when thinking of savory snacks for friends when they come over during the weekends.
Read on to learn a thing or two about these yummy roll-ups – from their history, to how to prepare them at the comfort of your kitchen.
History of fajitas
Fajitas started gaining notable popularity in 1969 when they appeared on a concession stand in Texas.
This was during a commemoration of the day Mexico gained independence from Spain.
From then, they started featuring on restaurant menus in Texas, but their popularity spiraled when they appeared on the menu of the Hyatt Regency in 1982.
Traditionally, fajitas were made from thin slices of the skirt steak cut across the grain.
The meat was then grilled to rare or medium-rare and served with warm tortillas topped with Pico de Gallo, guacamole, onions, cheese, and green peppers.
Today, the original definition and recipe have morphed, and both the meat and fillings have different variations.
Meat and vegetables, stir-fried with pepper and onions or grilled, then cut into strips, make up the majority of fajitas in Tex-Mex restaurants.
There are shrimp, chicken, lamb, pork, salmon, beef, and even vegan fajitas in various hotels and home recipes.
Chicken fajita rollup recipe
Making fajita at home is quite easy, and the ingredients are easily available.
Here’s how to make yours:
Tenderizing the meat
For fajita, the tenderness of the meat is not due to the cut of the meat, but rather how you slice it.
To get the best results, cut thin strips across the muscle grain ( cutting through the piece of meat as opposed to cutting on it).
This eases the burden of breaking up the muscle fibers; hence the meat becomes tender.
Marinate and grill the chicken breast first before slicing it into strips to achieve fork-tenderness.
Choosing the ingredients
Chicken – You can use any kind of boneless chicken, but the skinless chicken breast is great for cutting into strips.
If you get chicken strips at the store, take them to save preparation time.
Shredded lettuce – For convenience, buy the already shredded ones at the store.
Pico de Gallo – The fresh salsa mix of onion, tomatoes, cilantro, and jalapeno that has already been prepared can be bought at the store.
However, since it’s easy, I prefer to make mine at home.
Ingredients
4 chicken breast fillets
For the marinade
For the Maxi-ranch dipping sauce
Pico de Gallo
Preparation instructions
Serving fajitas
When you have company, instead of preparing to the last step, slice the grilled chicken into strips and saute with onions, pepper, and seasonings.
Then serve the fajita sizzling hot with warm tortillas with the condiments for each person to build their own taco/burrito.
The toppings could include shredded lettuce, guacamole, Pico de gallo, sour cream, shredded cheese, diced tomatoes, rice, and refried beans.
The correct way to eat a chicken fajita rollup Applebee’s
Since in most restaurants, fajitas are served with the fillings for you to make your burrito or taco, here is a tip on eating etiquette:
The best toppings for chicken fajita rollup Applebee’s
Your choice of toppings determines the difference in the taste of your fajita.
They can make the dish go from dull to a delightful relish.
When making a homemade chicken fajita, experiment with different toppings to find out what makes yours tick.
Some of the most common (and they are all great) toppings for chicken fajita rollup Applebee’s are:
Guacamole
You can never go wrong with guacamole; yummy creaminess and nutrition in one combination.
This perfect topping should not be missed when serving your awesome fajita.
Fortunately, it is also amazingly easy to prepare: Mash avocados, onion, tomatoes, jalapenos, and cilantro.
Sprinkle some lemon juice, pepper, and salt, and that’s it!
Bell peppers
Bell peppers add flavor and make your fajita colorful and appealing.
Seriously, who doesn’t love the bright green, orange, red, and yellow colors in their dish?
Go crazy and make a photo-worthy fajita with bell peppers.
For better results, marinate them in the sauce you used for the chicken.
They will soak in yummy flavors, then saute them for a few minutes, and they are good to go.
Tomatoes
Instead of the usually tasty raw tomatoes, try roasting them for a few minutes in the oven.
They are an incredible topping for your chicken fajita rollup Applebee’s.
Onions
Saute onions in butter just a bit longer so that they turn brown, and top it on your fajita.
For extra heat, add some jalapenos.
Lettuce
Shredded lettuce is the healthy topping on most fajitas, but have you ever tried to wrap your fajita using lettuce wraps instead of tortillas?
Go ahead for a different and healthier variation.
Sour cream
Sometimes things might get too spicy and hot, and all you need is something cold and creamy.
Sour cream adds an exciting twist and a lovely flavor to the fajita.
It is one of my favorite toppings because of its zesty taste.
Reheating your chicken fajita rollup Applebee’s
Chicken fajita can stay in the refrigerator for 3 to 4 days.
However, since it’s a combination of many ingredients, it is best to separate the ingredients and store them in a plastic airtight container.
Nonetheless, the main question is, how do you reheat cold or stored chicken fajita rollup Applebee’s?
With all the ingredients separate, here’s how to reheat your fajita:
Oven
Chicken loses moisture fast, and when put in the oven for reheating, it will become dry.
To avoid this, put the chicken strips in an oven dish and cover it with an aluminum foil.
This will keep your chicken fajita soft.
Then follow these steps:
Microwave
Because the fajita is prepared in butter or oil, there will be excess fat after microwaving; hence you will need paper towels to absorb it.
Conclusion
It is great to go out and enjoy a fajita in your favorite restaurant.
However, making yours at home is even better since you can make the amount you want and in the style that makes your heart thump in excitement.
Use the chicken fajita rollup Applebee’s recipe and add a tasty dish to your homemade kitchen secrets.
Going Tex-Mex With the Chicken Fajita Rollup Applebee’s
Equipment
- 1 bowl
- 1 Skillet
Ingredients
Instructions
- Combine all the marinade ingredients in a medium-size bowl.
- Stir well until the sugar is dissolved and let sit for 30 minutes.
- Place the four chicken breasts in the marinade, cover well, then put in the fridge to chill for about 2 hours ( do not marinate for more than 2 hours lest your chicken becomes tough).
- To prepare your dipping sauce, combine the ingredients in a medium-size bowl.
- Stir to mix well, then chill in the fridge.
- For the Pico de Gallo, mix all the ingredients in a bowl, cover well, and chill in the refrigerator.
- Put the grill on medium-high heat and place the chicken breasts until each side is cooked through (Usually 4-7 minutes per side, then turn to the other side)
- Separately, heat a large skillet on low heat and put a flour tortilla.
- Sprinkle about 1/2 cup of the cheese mixture on top as it cooks.
- When the cheese is almost wholly melting, remove the tortilla from the pan.
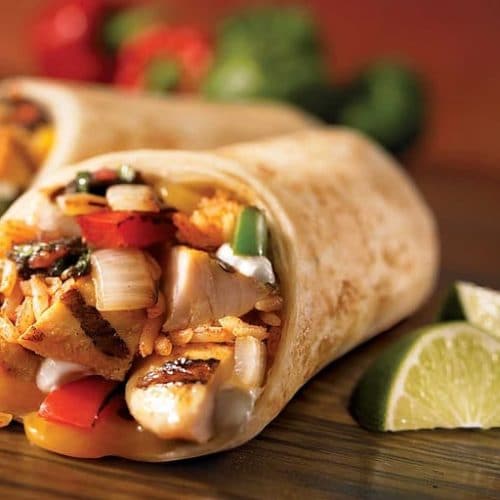
- Put about 1 cup of the shredded lettuce across the center of the tortilla, then add 3 tablespoons of Pico de Gallo.
- Slice the chicken breast into thin strips, then put them on the lettuce.
- Roll the tortilla by folding over the ends and then rolling from the bottom up.
- Finally, cut it at the centre.
- Serve the tortilla with the dipping sauce on the side.
