- Slow Cooker Potatoes Recipe - April 2, 2025
- Air Fryer Frozen Fish Fillets No Breading - April 2, 2025
- How to Make Ramen in the Microwave - April 2, 2025
The **karioka recipe glows**, captivating chefs and food lovers, **boosting** its **fame** to new levels.
It’s light, fluffy, and straightforward to make.
Plus, it has a delicious crispy taste when browned.
The granulated rice creates a chewy and sticky feel while coconut brings in the divine aroma, an irresistible combo.
Anyone’s sweet tooth will be satisfied with its soft texture, melt-in-your-mouth taste, and homemade goodness.
Karioka is a Filipino dessert made of glutinous rice flour, coconut milk, and sugar.
It is similar to palitaw in appearance but has a different taste.
The term “karioka” comes from the word “karit” or coconut meat, one of the ingredients used.
We have included a recipe to help you explore this amazing adventure, but first, let’s take a look at its history.

The History of The Karioka Recipe
During the Spanish colonial times, the Filipinos learned to eat a variety of rice-based desserts.
The Spaniards introduced the locals to sweet polvoron, marzipan, yema, Leche flan, turrones, etc.
The arrival of the Americans after the Spanish rule introduced new ingredients like chocolate and cream cheese.
The locals were also introduced to new cooking techniques and equipment.
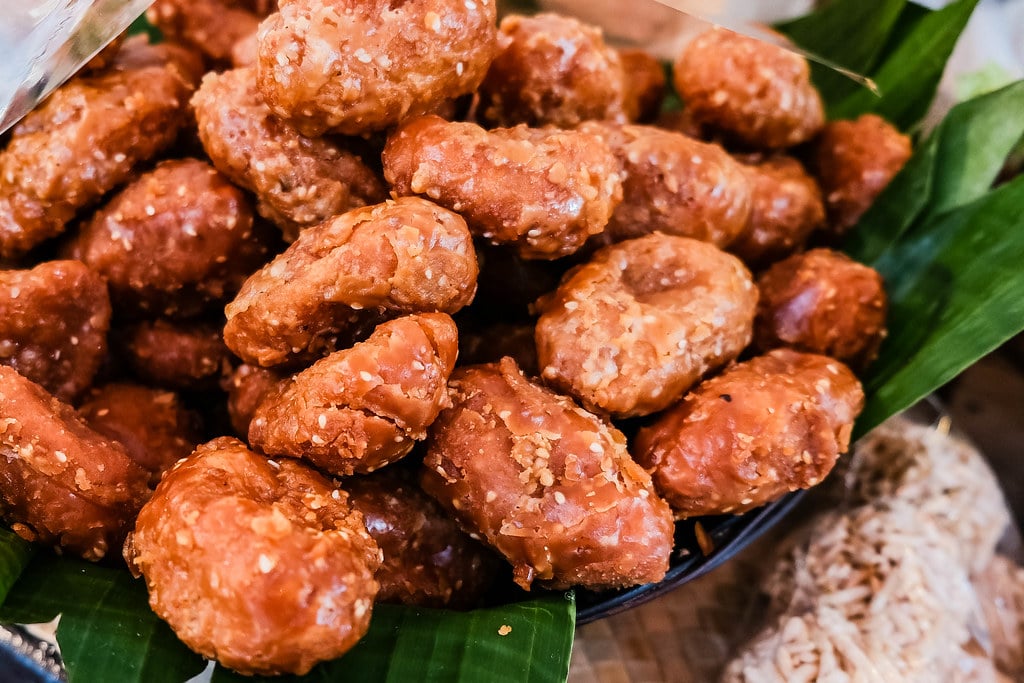
During this period, one of the popular desserts among Filipinos was a Filipino version of fried churros called karioka, made with coconut milk and rice flour.
Why You’ll Love Karioka
●It’s kid-friendly
Karioka has an irresistible flavor that your kids keep coming for more.
It hacks your way into having the kids eat other not-so-sweet but healthy foods by serving as sides.
Moreover, the bamboo stick makes them enjoy it more.
●Easy to make
With a few ingredients that are likely to be in your fridge, you will take less than an hour to cook.
Even the kitchen phobic will enjoy making this amazing dessert.
●It’s healthy
Karioka is gluten-free.
In addition, the ingredients have a variety of healthy benefits.
You’ll be confident to serve it to people with gluten and fat allergies.
How to Make Karioka
Karioka is a Filipino snack made from glutinous rice flour and coconut milk.
It’s often rolled in desiccated coconut and deep-fried.
In the Philippines, they sell karioka on the street, but it’s so easy to make at home that you don’t need to wait for your next trip to get your fix.
Next time you want a light, sweet dessert that’s also chewy, try making this Filipino karioka recipe.
It’s one of the easiest recipes to make and delicious.
Serve it with hot chocolate or plain milk.
Your guests will not be able to get enough of them!
Ingredients
●4 cup glutinous rice flour
●4 cups shredded coconut
●½ cup brown sugar
●2 ½ cup coconut milk
●2 tablespoon baking powder
●vegetable oil for frying
●cooking spray to grease the bowl and hands
Instructions:
1. Mix the glutinous rice flour, brown sugar, and coconut milk in a bowl until well combined.
2. Cover the mixture and let it rest overnight in the refrigerator; the balls will become softer when cooked.
The next day, remove the mixture from the fridge.
3. Grease your hands with oil to prevent the dough from sticking to your palms.
Scoop one tablespoon of the dough and roll it between your palms until you get a round ball shape.
4. Heat 2 inches of cooking oil in a pan over medium heat.
Deep-fry the karioka balls for about 5 minutes or until golden brown on all sides.
5. Remove them from the oil and drain them on paper towels to absorb excess oil.
Serve immediately while still warm.
Karioka Recipe
●Cuisine: Filipino
●Course: snack
●Preparation time: 20 minutes
●Cooking time: 10 minutes
●Total time: 30 minutes
●Servings: 8
Karioka Recipe Tips and Variations
Here are some of the most important tips for making karioka:
●To avoid the explosion of karioka in hot oil, poke holes at the center of each ball.
●Add about two tablespoons of melted butter or margarine to the mixture before kneading to make it extra moist.
●Use the oil you prefer, especially the neutral-tasting oils like vegetable oil, canola oil, or corn oil.
●If the dough is too sticky, add some coconut milk until soft or pliable or to your desired texture.
●Standardize the oil temperature.
The too hot temperature may burn and undercook the inner part, while too low temperature makes your karaoke greasy.
●Fry the karaoke balls in batches.
Overcrowding causes partial cooking and also makes the oil plummet.
Health Benefits
●Coconut contains lauric acid, a medium-chain fatty acid found in human breast milk.
It’s a powerful virus and gram-negative bacteria destroyer and is used as a nutritional supplement to help prevent many degenerative diseases.
●The flesh of coconuts contains a lot of fat, but it’s the good kind: It has been shown to increase HDL (good) cholesterol levels in your blood, which may help reduce heart disease risk.
●Coconut is an excellent source of dietary fiber that aids in digestion, prevents constipation, and improves the body’s ability to absorb essential nutrients.
●Coconut is rich in electrolytes and minerals and provides the body with a readily available source of glucose.
Coconut water has long been used as an intravenous hydration fluid.
●Rice is an excellent source of energy for our bodies.
It contains carbs that are easily broken down into glucose by the body to provide a fast burst of energy to meet our daily needs.
●Rice contains potassium, which contributes to lower blood pressure by balancing sodium levels in the body.
It also helps in preventing heart attacks and strokes.
What to Serve Along Karioka
●Other than the kale, use whatever you have on hand.
For example, you can throw in frozen vegetables instead of spinach.
The great thing about karioka is that it’s very customizable.
Plus, if you have children, this side dish is a quick and easy way to add greens to their diet.
●The tofu and sometimes the bacon adds an extra hearty element, while the karai sauce gives a nice spicy kick.
●Use dippings such as yogurt or blended fruits.
●Serve along with a mug of hot tea, milk, or coffee; you won’t get enough of it.
How to Use the Karioka Batter
●Make pancakes-Add in a couple of tablespoons of baking powder to make the batter lighter, which allows me to use a lower quantity of oil.
The texture is wonderfully fluffy.
While mixing, don’t forget to put in a reasonable amount of rice vinegar; it’ll ensure sturdy pancakes that won’t crumble or fall apart.
●Make karioka waffles- you’ll not go wrong with this art.
Get a lot more batter to the waffle iron by dividing it in half, then quickly cook and eat them fresh.
Your waffles will be a success—warm, fresh, delicious.
Conclusion
That’s all about the deceptively delicious karioka.
We hope you’ve learned a thing or two about cooking.
If you’re looking for a quick and easy recipe for any meal of the day, this is perfect.
It’s simple, tasty, and delicious.
The next time your kids ask you for a treat, karioka will make you win the challenge.
They’ll come asking for more.
For restaurant and bakery owners, this is a sweet spot to get more sales.
FAQs
What can I use in place of glutinous rice?
While glutinous rice is the best option to make karioka, tapioca starch and potato starch could be great substitutes.
They’ll provide the same chewy and sticky texture.
Can I caramelize karioka?
Yes. you can.
It will add a more exciting flavor to your karioka.
To caramelize, heat coconut milk and brown sugar under medium to low heat for 5-7 minutes.
When cooled, dip the karioka in caramel sauce.
What is the best way to store karioka?
The best method to use depends on how you plan on using your karioka in the future.
If you save it for use later, you should consider vacuum-sealing the stored karioka in plastic bags.
Ensure that it is free from oxygen, thus avoiding oxidation and, most importantly, degradation of the karaoke flavor and texture.
Degradation can be seen in the material’s color, which will change from a dark to a light brown, losing its donut flavor.
In general, it is best to avoid contact with air and sunlight.

Sticky Gluten-Free Karioka Recipe
Equipment
- 1 Pan
Ingredients
- 4 cup glutinous rice flour
- 4 cups shredded coconut
- ½ cup brown sugar
- 2 ½ cup coconut milk
- 2 tablespoon baking powder
- vegetable oil
Instructions
- Mix the glutinous rice flour, brown sugar, and coconut milk in a bowl until well combined.
- Cover the mixture and let it rest overnight in the refrigerator; the balls will become softer when cooked.
- The next day, remove the mixture from the fridge.
- Grease your hands with oil to prevent the dough from sticking to your palms.
- Scoop one tablespoon of the dough and roll it between your palms until you get a round ball shape.
- Heat 2 inches of cooking oil in a pan over medium heat.
- Deep-fry the karioka balls for about 5 minutes or until golden brown on all sides.
- Remove them from the oil and drain them on paper towels to absorb excess oil.
- Serve immediately while still warm.


